Thursday, April 25, 2013

Resizing (Shrinking) Guest Hard Drive Sizes With VMware Standalone Converter (vSphere 5) ESXi Server 5.1


If you want to shrink your guest hard drive size then you can use VMware Converter standalone converter

1. Installing VMware converter is pretty straightforward, run the install file and accept all the defaults. Install the converter on same machine (Virtual) that you want to resize.


2. Run the application


3. Choose Open> convert machine> choose this local machine


4. Choose the destination type (in this case choose VMware Infrastructure virtual machine) and enter the credentials for ESXi Server


5. Customize the size of disk, CPU, RAM what you want, (We are working on decreasing the size of disk)


6. Confirm the size and go for convert, it will take some time according to the machine size and configuration


7. Delete the source machine as you have now less disk size virtual machine on ESXi Server.

Friday, April 12, 2013

Configuring Network Time Protocol (NTP) on ESX/ESXi 4.1 and ESXi 5.0 hosts using the vSphere Client


To configure NTP on ESX/ESXi 4.1 and ESXi 5.0 hosts:

  1. Connect to the ESX/ESXi host using the vSphere Client.
  2. Select a host in the inventory.
  3. Click the Configuration tab.
  4. Click Time Configuration.
  5. Click Properties.
  6. Click Options.
  7. Click NTP Settings.
  8. Click Add.
  9. Enter the NTP Server name. For example, 0.pool.ntp.org and 1.pool.ntp.org.
  10. Click OK.
  11. Click the General tab.
  12. Click Start automatically under Startup Policy.
  13. Click Start and click OK.
  14. Click OK to exit.

Wednesday, April 10, 2013

Installation of VMware Tools in a Linux guest (CentOS 6.3)


To install VMware Tools in a Linux guest operating system using Compiler:
Ensure that your Linux virtual machine is powered on.
If you are running a GUI interface, open a command shell.

Note: Log in as a root user, or use the sudo command to complete each of these steps.

Click VM in the virtual machine menu, then click Guest > Install/Upgrade VMware Tools and click OK.
To create a mount point, run:

mkdir /mnt/cdrom

To mount the CDROM, run:

mount /dev/cdrom /mnt/cdrom

To copy the Compiler gzip tar file to a temporary local directory, run:

cp /mnt/cdrom/VMwareTools-<version>.tar.gz /tmp/

Where <version> is the VMware Tools package version.

To determine the version of VMware tools, run:

ls /mnt/cdrom

You see an output similar to:

# VMwareTools-5.0.0-12124.tar.gz

To change to the tmp directory and extract the contents of the tar file into a new directory called vmware-tools-distrib, run:
cd /tmp
tar -zxvf VMwareTools-<version>.tar.gz

To change directory to vmware-tools-distrib and run the vmware-install.pl PERL script to install VMware Tools, run:
cd vmware-tools-distrib
./vmware-install.pl

Notes:
Follow the screen prompts to install the VMware Tools. Options in square brackets are default choices and can be selected by pressing Enter.
To compile VMware Tools successfully, you need gcc Compiler and Linux Kernel sources provided by your Linux distribution. Consult your Linux distribution documentation for details on how to install these packages.
It is normal for the console screen to go blank for a short time during the installation when the display size changes.
Some warnings or errors are normal, like when a files does not exist.
Depending on the Linux distribution, your network service might restart after installation. VMware recommends that you invoke this command from the console and not remotely.

If you are running a GUI interface, restart your X Window session for any mouse or graphics changes to take effect.
To start VMware Tools running in the background during an X Window session, run:

/usr/bin/vmware-toolbox &

Depending on your environment you may need to unmount the CDROM. To unmount the CDROM, run:

umount /mnt/cdrom

Depending on your environment, you may need to manually end the VMware Tools installation. To end the VMware Tools install, click VM in the virtual machine menu, then click Guest > End VMware Tools Install.
To remove VMware Tools installation packages, run:
cd
rm /tmp/VMwareTools-<version>.tar.gz
rm -rf /tmp/vmware-tools-distrib

Thursday, April 4, 2013

Installing tomcat7 on CentOS 6.3


Java should be installed before installing tomcat, please read my previous blog to install java
Download apache tomcat from here
#wget http://apache.techartifact.com/mirror/tomcat/tomcat-7/v7.0.39/bin/apache-tomcat-#7.0.39.tar.gz
#tar -xvf apache-tomcat-7.0.39.tar.gz
#mv apache-tomcat-7.0.39 tomcat-7.0.39
#mv tomcat-7.0.39/ /usr/share/
cd /usr/share/tomcat-7.0.39/
Now create tomcat service and set it to start on boot
#vim /etc/init.d/tomcat and paste the below on to that
#!/bin/bash
# description: Tomcat Start Stop Restart
# processname: tomcat
# chkconfig: 234 20 80
export JAVA_HOME
PATH=$JAVA_HOME/bin:$PATH
export PATH
CATALINA_HOME=/usr/share/tomcat7
case $1 in
start)
sh $CATALINA_HOME/bin/startup.sh
;;
stop)
sh $CATALINA_HOME/bin/shutdown.sh
;;
restart)
sh $CATALINA_HOME/bin/shutdown.sh
sh $CATALINA_HOME/bin/startup.sh
;;
esac
exit 0 
#chkconfig --add tomcat
#chkconfig --level 234 tomcat on
#chkconfig --list tomcat
Now you can start stop tomcat by executing the below command
#service tomcat stop
#service tomcat start
This should work fine now.

Installing Redis on Linux (CentOS 6.3)


Download redis from redis.io
#wget https://redis.googlecode.com/files/redis-2.4.17.tar.gz
#tar -xvf redis-2.4.17.tar.gz
#cd /opt/redis-2.4.17/src
#make install
now this copy redis-server, redis-cli and conf file to /usr/local/bin
open the port in firewall for redis
now make this service run on start up add the below line in rc.local
#vim /etc/rc.local
nohup /usr/local/bin/redis-server &
Close the editor and now the server will start at boot, check by redis-cli
#cd /usr/local/bin
#./redis-cli
redis 127.0.0.1:6379>
It is installed and working now.

Tuesday, March 26, 2013

Installation of Java Runtime Edition (JRE) 1.7 in Centos 6.2 and Uninstallation of JDK


Uninstallation of JDK (Open Java)
# yum remove java

Installing from rpm package

Go to the Oracel Download page and download the package.

# wget http://download.oracle.com/otn-pub/java/jdk/7u17-b02/jdk-7u17-linux-x64.rpm

Go to the downloaded location

change the package mode to executeable

# chmod 755 jdk-7u17-linux-x64.rpm

Install it

# yum install jdk-7u17-linux-x64.rpm

Now check the version

# java -version

You should get the result like below:

java version "1.7.0_17"
Java(TM) SE Runtime Environment (build 1.7.0_17-b02)
Java HotSpot(TM) 64-Bit Server VM (build 23.7-b01, mixed mode)

Setting JAVA_HOME for a single user and all users:

check java by

#which java
/usr/bin/java

we can check whether this java file is located

# ls -al /usr/bin/java
lrwxrwxrwx. 1 root root 26 Mar 24 20:15 /usr/bin/java -> /usr/java/default/bin/java

#cd /usr/java
#ls -al
drwxr-xr-x.  3 root root 4096 Mar 24 20:15 .
drwxr-xr-x. 14 root root 4096 Mar 24 20:15 ..
lrwxrwxrwx.  1 root root   16 Mar 24 20:15 default -> /usr/java/latest
drwxr-xr-x.  8 root root 4096 Mar 24 20:15 jdk1.7.0_17
lrwxrwxrwx.  1 root root   21 Mar 24 20:15 latest -> /usr/java/jdk1.7.0_17

The above shoes that default softlink to /usr/java/latest and latset softlink to /usr/java/jdk1.7.0_17
The genuine directory for java is /usr/java/jdk1.7.0_17

For a single user:

# vi ~/.bash_profile
# export JAVA_HOME=/usr/java/jdk1.7.0_17
# export PATH=$PATH:/usr/java/jdk1.7.0_17/bin

For all users:

# vi /etc/profile
# export JAVA_HOME=/usr/java/jdk1.7.0_17
# export PATH=$PATH:/usr/java/jdk1.7.0_17/bin

Thursday, January 24, 2013

Datastore with NAS (Netgear ReadyNAS 2100) with ESXi 5.0

Step1: Create the NFS Share on Netgear ReadyNAS 2100 / Any NAS Drive

Very first check weather your NAS have NFS protocol enable if not then enable it.
Add Share>Share name

Click on NFS link and then change the read/write access to this folder.

Step2: Prior to map the Datastore on NAS drive we need to change the Networking configuration for the ESXi 5.0 Server.


Select the VMKernel as this handles the traffic for vSpher vMotion, iSCSI, NFS and host management


Select the existing switch or create the new, I have selected the same


Then Provide the Static or DHCP IP to this network and finish.


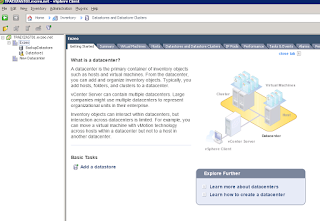
Step3: On ESXi Server Open vCenterServer console and go to Datastore and Datastore Clusters
Click Add Datastore


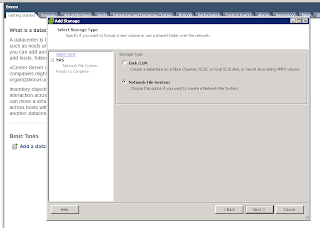
Now Select the host and click Next, Select Network File System

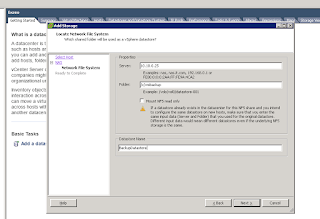
Provide the Server IP (NFS Server) and provide the path of that folder (NFS Folder), you can get this path by logging in to through putty on the NFS Server in my case it was /c/vmbackup

This will mount the Datastore on to ESXi and you can copy and move file to this Datastore.


Friday, August 24, 2012

Solr with Apache on Windows 7 and Windows Server 2008 R2

Download Apache7 Windows Service installer from the below location:
Install as a service by executing the exe
Download solr and unzip it on to disk
unzip it apache-solr-3.6.1
create c:\web\  and copy folder apache-solr-3.6.1\example to c:\web\
rename apache-solr-3.6.1\apache-solr-3.6.1\dist\apache-solr-3.6.1.war to solr.war
Now copy solr.war to C:\Program Files (x86)\Apache Software Foundation\Tomcat 7.0\webapps\
Now create solr.xml file n C:\Program Files(x86)\Apache Software Foundation\Tomcat 7.0\conf\Catalina\localhost\
For Single Core:
Add the below content in solr.xml:
<?xml version="1.0" encoding="UTF-8"?>
<Context docBase="C:\Program Files(x86)\Apache Software Foundation\Tomcat 7.0\webapps\solr.war" debug="0" crossContext="true" >
    <Environment name="solr/home" type="java.lang.String" value="C:\web\example\solr" override="true" />
</Context>

Restart Apache and the single core will run
Note: DocBase and Solr/Home path should match your system drive and path
For Multicore:
add the below content in solr.xml:
<?xml version="1.0" encoding="UTF-8"?>
<Context docBase="C:\Program Files(x86)\Apache Software Foundation\Tomcat 7.0\webapps\solr.war" debug="0" crossContext="true" >
    <Environment name="solr/home" type="java.lang.String" value="C:\web\example\multicore" override="true" />
</Context>

By default it has two core but if you want to add one or many core then make copy of one core and rename it (say core2) then add the core name to the  C:\web\example\multicore\solr.xml add the below line for new core
<cores adminPath="/admin/cores">
    <core name="core0" instanceDir="core0" />
    <core name="core1" instanceDir="core1" />
    <core name="core2" instanceDir="core2" />
  
Restart Apache and you will get solr running with multiple core.