Friday, September 6, 2013

Jetty Web Server on CentOS 6


Download Jetty 7 from the website http://www.eclipse.org/jetty/. I have decided to install Jetty located at /srv rather than /opt but you can install it anywhere you like. I ran the following commands to help with the installation.

#cd /srv


wget http://download.eclipse.org/jetty/7.4.5.v20110725/dist/jetty-distribution-7.4.5.v20110725.tar.gz


#tar zxf jetty-distribution-7.4.5.v20110725.tar.gz


#ln -s jetty-distribution-7.4.5.v20110725 jetty


The last command just creates a link from the directory jetty to the directory created when you extracted the tar archive. Next I shall show you how to create a user to run Jetty with. You can also make it run on startup automatically so that when you reboot you do not need to start it.


#adduser -r -m jetty

#chown -R jetty:jetty /srv/jetty

#cd /etc/init.d

#ln -s /srv/jetty/bin/jetty.sh jetty

#chkconfig --add jetty

#chkconfig --level 345 jetty on


You will need to add some values so that Jetty can find your default java install and to set the port which you wish to add jetty to. You can add these values to either jetty.sh or /etc/default/jetty which is the preferred way of configuring applications on Linux.


You should now be able to start Jetty freely with the following command.


#service jetty start

Wednesday, July 10, 2013

Setting up the Subversion Sync between two Server (Primary-Secondary)


I assume that you have working Primary Subversion Server.  I also assume that you have new Subversion Server that would act as a Secondary Server. All the action should be done on Secondary Server.

Primary Server: https://svn.vaseem/svn/reponame/
Secondary Server: https://svn.vaseem2.com/svn/reponame/
     
1.  Create the repo (claimcolony) with the following command or by GUI
svnadmin create "C:\Repositories\reponame”
we can check the revision and other information by the following command
svn info https://svn.vaseem.com/svn/reponame/
Path: igdbatchtool
URL: https://svn.vaseem/svn/xyzrepo
Repository Root: https://svn.vaseem/svn/xyzrepo
Repository UUID: aaac7bac-4d54-a44b-87f7-7681aaadcd9b
Revision: 0
Node Kind: directory
Last Changed Rev: 0
Last Changed Date: 2012-07-06 05:55:11 -0700 (Fri, 06 Jul 2012)
   
2.  Check the UUID of created repo with
svn info https://svn.vaseem/svn/xyzrepo/

set the same UUID for the newly created repo as of Primary repo by command

svnadmin setuuid  /path/of/repo/  UUID of Primary repo
svnadmin setuuid "D:\Repositories\xyzrepo" db5423f0-d7e9-4b4a-b701-935fb5d42e4b
     
3.  Initialize the sync from Primary repository by the below command
svnsync initialize DEST_URL SOURCE_URL
this will throw errors so we need to go to the mirror (secondary) repo and need to change the pre-revporp-change hook to change so that it can accept the change


Now initialize the sync for repository
svnsync initialize DEST_URL SOURCE_URL
svnsync initialize https://svn.vaseem.com/svn/xyzrepo/
https://svn.vaseem2.com/svn/xyzrepo/

Now start sync
svnsync sync DEST_URL SOURCE_URL

svnsync sync https://svn.vaseem.com/svn/xyzrepo/
https://svn.vaseem2.com/svn/xyzrepo/
this will start syncing…


JIRA Installation and Configuration


Step 1. Installation postgresql 

yum install postgresql postgresql-server

[root@TPAEXZSLRD01 opt]# yum install postgresql postgresql-server
Loaded plugins: fastestmirror, security
Determining fastest mirrors
 * base: mirror.us.leaseweb.net
 * extras: mirror.umd.edu
 * updates: mirror.cs.vt.edu
base                                                                                                                  | 3.7 kB     00:00
base/primary_db                                                                                                       | 4.4 MB     00:05
extras                                                                                                                | 3.5 kB     00:00
extras/primary_db                                                                                                     |  19 kB     00:00
updates                                                                                                               | 3.5 kB     00:00
updates/primary_db                                                                                                    | 2.5 MB     00:01
Setting up Install Process
Resolving Dependencies
--> Running transaction check
---> Package postgresql.x86_64 0:8.4.13-1.el6_3 will be installed
--> Processing Dependency: postgresql-libs(x86-64) = 8.4.13-1.el6_3 for package: postgresql-8.4.13-1.el6_3.x86_64
--> Processing Dependency: libpq.so.5()(64bit) for package: postgresql-8.4.13-1.el6_3.x86_64
---> Package postgresql-server.x86_64 0:8.4.13-1.el6_3 will be installed
--> Running transaction check
---> Package postgresql-libs.x86_64 0:8.4.13-1.el6_3 will be installed
--> Finished Dependency Resolution

Dependencies Resolved

=============================================================================================================================================
 Package                                 Arch                         Version                               Repository                  Size
=============================================================================================================================================
Installing:
 postgresql                              x86_64                       8.4.13-1.el6_3                        base                       2.8 M
 postgresql-server                       x86_64                       8.4.13-1.el6_3                        base                       3.4 M
Installing for dependencies:
 postgresql-libs                         x86_64                       8.4.13-1.el6_3                        base                       200 k

Transaction Summary
=============================================================================================================================================
Install       3 Package(s)

Total download size: 6.4 M
Installed size: 29 M
Is this ok [y/N]: Y
Downloading Packages:
(1/3): postgresql-8.4.13-1.el6_3.x86_64.rpm                                                                           | 2.8 MB     00:02
(2/3): postgresql-libs-8.4.13-1.el6_3.x86_64.rpm                                                                      | 200 kB     00:00
(3/3): postgresql-server-8.4.13-1.el6_3.x86_64.rpm                                                                    | 3.4 MB     00:02
---------------------------------------------------------------------------------------------------------------------------------------------
Total                                                                                                        1.1 MB/s | 6.4 MB     00:05
Running rpm_check_debug
Running Transaction Test
Transaction Test Succeeded
Running Transaction
  Installing : postgresql-libs-8.4.13-1.el6_3.x86_64                                                                                     1/3
  Installing : postgresql-8.4.13-1.el6_3.x86_64                                                                                          2/3
  Installing : postgresql-server-8.4.13-1.el6_3.x86_64                                                                                   3/3
  Verifying  : postgresql-server-8.4.13-1.el6_3.x86_64                                                                                   1/3
  Verifying  : postgresql-libs-8.4.13-1.el6_3.x86_64                                                                                     2/3
  Verifying  : postgresql-8.4.13-1.el6_3.x86_64                                                                                          3/3

Installed:
  postgresql.x86_64 0:8.4.13-1.el6_3                                postgresql-server.x86_64 0:8.4.13-1.el6_3

Dependency Installed:
  postgresql-libs.x86_64 0:8.4.13-1.el6_3

Complete!
[root@TPAEXZSLRD01 opt]# chkconfig postgresql on
[root@TPAEXZSLRD01 opt]# service postgresql start

/var/lib/pgsql/data is missing. Use "service postgresql initdb" to initialize the cluster first.
                                                           [FAILED]
[root@TPAEXZSLRD01 opt]# ^C
[root@TPAEXZSLRD01 opt]# service postgresql initdb
Initializing database:                                     [  OK  ]
[root@TPAEXZSLRD01 opt]#service postgresql start
Starting postgresql service:                               [  OK  ]
[root@TPAEXZSLRD01 opt]# vim /etc/sysconfig/iptables
[root@TPAEXZSLRD01 opt]# /etc/init.d/iptables restart
iptables: Flushing firewall rules:                         [  OK  ]
iptables: Setting chains to policy ACCEPT: filter          [  OK  ]
iptables: Unloading modules:                               [  OK  ]
iptables: Applying firewall rules:


CREATE USER jirauser WITH PASSWORD 'password';

CREATE DATABASE jiradb;

GRANT ALL PRIVILEGES ON DATABASE jiradb to jirauser;


Error connecting to database

FATAL: Ident authentication failed for user "jirauser"

#vim /var/lib/pgsql/data/pg_hba.conf

# "local" is for Unix domain socket connections only
local   all         all                               trust
# IPv4 local connections:
host    all         all         127.0.0.1/32          trust
host    all         all        10.10.0.2 255.255.255.0 trust
# IPv6 local connections:
#host    all         all         ::1/128               md5
host all all 0.0.0.0 0.0.0.0 trust


Step 2: Installation of JIRA

This will install JIRA 4.4.1 on your computer.
OK [o, Enter], Cancel [c]

If JIRA is already installed on this machine, please read the following information carefully.
Please choose between creating a new JIRA installation or upgrading an
existing JIRA installation.
Create a new JIRA installation. [1, Enter], Upgrade an existing JIRA installation. [2]
2
Existing JIRA installation directory:
[/opt/JIRA]

No directory found in specified location
Finishing installation ...
[root@moscow opt]# ./atlassian-jira-4.4.1-x32.bin
Unpacking JRE ...
Starting Installer ...

This will install JIRA 4.4.1 on your computer.
OK [o, Enter], Cancel [c]

If JIRA is already installed on this machine, please read the following information carefully.
Please choose between creating a new JIRA installation or upgrading an
existing JIRA installation.
Create a new JIRA installation. [1, Enter], Upgrade an existing JIRA installation. [2]
1

Where should JIRA 4.4.1 be installed?
[/opt/atlassian/jira]

Default location for JIRA data
[/var/atlassian/application-data/jira]

Configure which ports JIRA will use.
JIRA requires two TCP ports that are not being used by any other
applications on this machine. The HTTP port is where you will access JIRA
through your browser. The Control port is used to Startup and Shutdown JIRA.
Use default ports (HTTP: 8080, Control: 8005) - Recommended [1, Enter], Set custom value for HTTP and Control ports [2]

JIRA can be run in the background.
You may choose to run JIRA as a service, which means it will start
automatically whenever the computer restarts.
Install JIRA as Service?
Yes [y, Enter], No [n]
y

Extracting files ...


Please wait a few moments while JIRA starts up. Depending on your system this may take a few minutes.
Launching JIRA ...

Setup has finished installing JIRA 4.4.1 on your computer.
JIRA 4.4.1 can be accessed at http://localhost:8080
Finishing installation ...

Step 3: Configuration of JIRA

Launch the browser and access the JIRA: http://localhost:8080


Resizing the disk space on Linux VMs running on VMware ESXi 5

Step1:

Connect to your ESXi Server and switch off the machine running on ESXiEdit the disk and increased the desired size and reboot the machine.


Step 2:


Now this machine is up and running and having the unallocated disk space, we need to use this

Login to machine via ssh


List the disk partition


# fdisk -l /dev/sda


Disk /dev/sda: 171.8 GB, 171798691840 bytes

255 heads, 63 sectors/track, 20886 cylinders
Units = cylinders of 16065 * 512 = 8225280 bytes
Sector size (logical/physical): 512 bytes / 512 bytes
I/O size (minimum/optimal): 512 bytes / 512 bytes
Disk identifier: 0x000b5bc9

   Device Boot      Start         End      Blocks   Id  System

/dev/sda1   *           1          64      512000   83  Linux
Partition 1 does not end on cylinder boundary.

/dev/sda2              64       13055   104344576   8e  Linux LVM

so the disk have two partition /dev/sda1 and /dev/sda2

Create new partition

#fdisk /dev/sda

type n - to create a new partition
WARNING: DOS-compatible mode is deprecated. It's strongly recommended to
         switch off the mode (command 'c') and change display units to
         sectors (command 'u').

Command (m for help): n
type p - for primary partition
Command action
   l   logical (5 or over)
   p   primary partition (1-4)
p
We already have /dev/sda1 and /dev/sda2 Press ’3′ for this new partition which will be created as /dev/sda3
Partition number (1-4): 3
Just press enter twice above as by default the first and last cylinders of the unallocated space should be correct. After this the partition is then ready.
First cylinder (3211-4456, default 2611): "enter"
Using default value 4456
Last cylinder, +cylinders or +size{K,M,G} (3211-4456, default 4456): "enter"
Using default value 4456
Command (m for help): t
Partition number (1-5): 3
type 8e - for the "Linux LVM" type
Hex code (type L to list codes): 8e
Changed system type of partition 3 to 8e (Linux LVM)
type w - to write changes and exit
Command (m for help): w
The partition table has been altered!

Calling ioctl() to re-read partition table.

WARNING: Re-reading the partition table failed with error 16: Device or resource busy.
The kernel still uses the old table. The new table will be used at
the next reboot or after you run partprobe(8) or kpartx(8)
Syncing disks.

Now Reboot the machine
Increasing the logical volume

We use the pvcreate command which creates a physical volume for later use by the logical volume manager (LVM). In this case the physical volume will be our new /dev/sda3 partition.
# pvcreate /dev/sda3
let's now create the physical volume in that partition:

# pvcreate /dev/sda3
Now let's extend the server's Volume Group to that physical volume.

# vgdisplay

Note down the entry next to "VG Name". That's your Volume Group name.


# vgextend EnterVolumeGroupNameHere /dev/sda3


#####

If you get a message saying /dev/sda3 could not be added to your Volume Group, you need to remove the physical volume and recreate it. Metadata might have gotten corrupt and thus the volume cannot be added to your Volume Group. So just do:

# pvremove /dev/sda3

And then again:

# pvcreate /dev/sda3

#####


Since we're (essentially) extending the main logical volume, let's get the name of that:

# lvdisplay

and note down the entry next to "LV Name". This is your logical volume's name (e.g. /dev/srv/root), which you'll now extend to the newly added partition/physical volume.


- Extend the logical volume by X GBs:

# lvextend -L +XG yourLogicalVolumeName
Make sure you replace X above with the actual number of GBs you've added in your VM's settings. So if you increased your VM by 20GBs, the command becomes:

# lvextend -L +20G yourLogicalVolumeName


Finally, let's resize the file system to the new allocated space:

$ resize2fs yourLogicalVolumeName

(this may take some time depending on number of GBs added to the file system.


- Check the new file system sizes:

# df -hT


This is all done.

Tuesday, May 28, 2013

Reset Root Password on CentOS 5 & 6


Below are the steps to Reset the Password for Root:

Boot or Reboot your CentOS and Hold the Arrow button to bring the Grub menu, From the GRUB menu, select the appropriate kernel version and press the 'e' key.


You will now be presented with the option menu for the kernel version

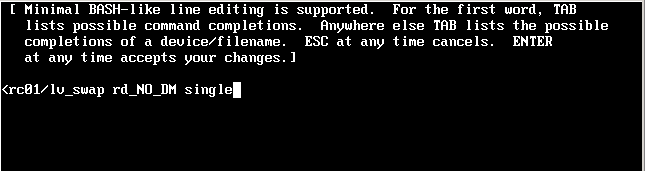
From this menu, select the kernel /vmlinuz-... line and press the 'e' key.You will now be presented with the kernel boot options, add single at the end of line, Press enter to save your changes and Press 'b' to boot from this


This will boot up in single user mode, Now you will boot up to the root shell and you can use passwd to set your new password.


Issue passwd command to reset the password

Reboot and you have a new root password for your CentOS installation.

Saturday, May 25, 2013

Howto Free up used memory on a Linux operating system


Usually the kernel handles memory utilization pretty well it caches memory for dentry cache, page cache and inodes which improves IO speed and performance generally. But in some cases user applications needs lots of memory and we need to clear what’s called dirty memory which could be inodes already written to the disk, so now the kernel given us the option to manage this manually.
To Free
echo 1 > /proc/sys/vm/drop_caches
echo 2 > /proc/sys/vm/drop_caches
echo 3 > /proc/sys/vm/drop_caches
free -m
total used free shared buffers cached
Mem: 3833 2827 1005 0 31 1030
-/+ buffers/cache: 1765 2067
Swap: 10095 0 10095
~ $free -m

                     total       used          free     shared    buffers     cached
Mem:           5754       1551       4202          0        258        980
-/+ buffers/cache:          313       5441
Swap:           5215            0       5215


Here "buffers" and "cached" columns, which tell you about the amount of memory that the kernel is using for filesystem buffers, etc

So in this example, 5441MB is how much memory is technically available for allocation should an application need it. The "buffers" (258MB) and "cached" (980MB) will be released by the kernal if they are needed.

Tuesday, May 7, 2013

Reconfiguring Network Interfaces in CentOS/RHEL Systems Cloned with vCenter


While cloning CentOS VMs in our environment, I ran into a problem where eth0 wouldn’t start up. When trying to start the networking service, the following error popped up:

Bringing up interface eth0: Device eth0 does not seem to be preset, delaying initialization.      [FAILED]


The reason this error occurs is because networking adapters in cloned VMs are assigned unique MAC addresses, so they don’t conflict with the parent VM. During OS installation, the installer detects the network adapter and udev configures the mapping between the device eth0 and the MAC address. When the MAC address changes udev thinks the device is missing.

To fix this, we need to update udev’s mapping rules to point the eth0 definition to the device with the correct MAC address. Open the file /etc/udev/rules.d/70-persistent-net.rules. You should see something similar to what is below:

# PCI device 0x8086:0x100f (e1000) (custom name provided by external tool)
SUBSYSTEM=="net", ACTION=="add", DRIVERS=="?*", ATTR{address}=="00:50:56:9c:00:16", ATTR{type}=="1", KERNEL=="eth*", NAME="eth0"

# PCI device 0x8086:0x100f (e1000) (custom name provided by external tool)
SUBSYSTEM=="net", ACTION=="add", DRIVERS=="?*", ATTR{address}=="00:50:56:9c:00:18", ATTR{type}=="1", KERNEL=="eth*", NAME="eth1"

As you can see there are two PCI ethernet adapters present. The original one from the parent VM (MAC: 9c:00:16) and the new one from the current VM (MAC: 9c:00:18). To fix the issue you need to change the eth0 device definition to have the correct MAC address (9c:00:18) and remove the eth1 device. Your resulting file will look like so:

You have to update the /etc/sysconfig/network-scripts/ifcfg-eth0 file to reflect the correct MAC address. Then, after a quick system restart your eth0 adapter will be back up.

Date and Time in Linux


Set Date

Use the following syntax to set new data and time:
date --set="STRING"

set new data to 23 Jan 2012 2:12:15

date --set="Tue Jan 23 2:12:15 EDT 2012"

You can format as belwo:

date +%Y%m%d -s "20120910"


Set Time

Use the following syntax to set time:

# date +%T -s "11:10:05"

11Hour (hh)

10: Minute (mm)

05: Second (ss)

Use %p locale’s equivalent of either AM or PM, enter:

# date +%T%p -s "2:12:30AM"

# date +%T%p -s "11:12:30PM"