Thursday, February 6, 2014

Amazon Terminology


Terminology
The following terms defined by Amazon Web Services are used in this help file and defined here for your convenience:
·    Amazon Machine Image (AMI)Amazon Machine Images are machine images stored within Amazon’s infrastructure. An AMI contains the operating system and other software such as ScaleOut StateServer. A pre-packaged AMI that is configured with ScaleOut StateServer is available in the AWS Marketplace.
·    InstanceAn instance represents a single running copy of an Amazon Machine Image (AMI).
·    RegionAmazon EC2 allows you to run EC2 instances in multiple geographic locations called regions. When deploying your ScaleOut StateServer instances, it is highly recommended that you select a region with the closest geographical proximity to the majority of your WAN traffic, if applicable.
·    Availability ZoneEvery AWS region comprises two or more isolated units of failure within the Amazon Web Services environment called availability zonesA failure in one availability zone is unlikely to propagate to other availability zones within the same region. Resources within the same availability zone will experience lower average network latency than resources that cross availability zones.
·    Key Pairkey pair is a public-key, private-key encryption system used by Linux-based instances for authentication when logging in to the systems via SSH. A key pair consists of a public key and a private key, and the matching key must be provided to authenticate against a running EC2 instance. An instance may have only one key pair defined at launch, and it may not be changed after launch. An instance without a key pair defined at launch will not be able to grant authentication for advanced administration via remote SSH login.
·    Private IP: A private IP address belongs to a single instance and is only routable from within the instance's associated EC2 Region. Data transfer fees do not apply to data transferred using private IP addresses. When operating within the same EC2 region, use of the private IP Address is preferred to avoid data transfer fees.
·    Public IP: A public IP address belongs to a single instance and is routable from within the EC2 environment, including from other EC2 regions, and from external, Internet locations.
·    Elastic IP (EIP)An Elastic IP (EIP) is a fixed (static) public IP address allocated through EC2 and assigned to a running virtual machine instance. Elastic IPs exist independently of virtual machine instances and may be attached to only a single instance at a time, but they may be reassigned to a different instances with complete transparency to end users. If an Elastic IP is associated with an instance, it invalidates and overrides the original public IP.
·    Security Groupsecurity group is a named set of allowed inbound network connection rules for EC2 instances. Each security group consists of a list of protocols, ports, and source IP address ranges. A security group can apply to multiple instances, and an instance can be a member of multiple security groups. Security groups may only be assigned to an instance when the instance is being launched. Changes to a security group’s allowed inbound network connections apply to all instances assigned to that Security Group. By default, the SOSS management tools create a new security group for each deployed SOSS store.
·    Placement GroupA cluster placement group is a logical entity that enables creating a cluster of instances with special characteristics, such as high speed networking. Using a placement group, a cluster of instances can have low latency, 10 gigabit Ethernet bandwidth connectivity between instances in the cluster.

Why an EC2 Instance Isn’t a Server


Why an EC2 Instance Isn’t a Server

From all outward appearances, and even functionally-speaking, an EC2 instance behaves as a virtualized server: A person can SSH (or Remote Desktop) into it and install nearly any application. In fact, from my experience, this is how >95% of developers are using AWS. However, this is a very myopic view of the platform. Most of the complaints levied against AWS (unreliable, costly, difficult to use) are by those who are trying to use EC2 as if it were a traditional server located in a datacenter.
To truly understand AWS, we have to examine Amazon’s DNA. In 2002-2003, a few years prior to the introduction of EC2, Bezos boldly committed the entire organization to embracing service-oriented architecture. SOA is not unlike object-oriented programming (OOP): each function is discretely contained into an isolated building block and these pieces connect together via an agreed-upon interface. In software design, for example, this would allow a programmer to use a third-party library without needing to understand how the innards work. SOA applies the same principles at the organizational level. Bezos mandated that all business units compartmentalize their operations and only communicate through well-defined (and documented) interfaces such as SOAP/RESTful APIs.
For an organization of Amazon’s size, this change was a big deal. The company had grown very rapidly over the previous decade which led to the web of interconnectedness seen in all large companies: purchasing and fulfillment might share the same database server without either knowing who’s ultimately responsible for it, IT operations might have undocumented root access to payroll records, etc. Amazon.com’s organic growth had left it full of the equivalent of legacy “spaghetti code.” Bezos’ decision to refactor the core of operations required a tremendous amount of planning and effort but ultimately lead to much more scalable and manageable organization. As a result of the SOA initiative, in 2006, a small team in South Africa released a service that allowed computing resources to be provisioned on-demand using an API: Amazon Elastic Compute Cloud (EC2) was born. Along with S3, it was the first product of the newly introduced Amazon Web Services unit (since spun off into a separate business).
Amazon Web Services is the world’s most ambitious—and successful—result of service-oriented architecture.  This philosophy drives product innovation and flows down to its intended usage. When competitors like Rackspace argue “persistence” as a competitive advantage, they’re missing the entire point of AWS. EC2 is the antithesis of buying a server, lovingly configuring it into a unique work of art, and then making sure it doesn’t break until it’s depreciated off the books. Instead, EC2 instances are intended to be treated as disposable building blocks that provide dynamic compute resources to a larger application. This application will span multiple EC2 instances (autoscaling groups) and likely use other AWS products such as DynamoDB, S3, etc. The pieces are then glued together using Simple Queue Service (SQS), Simple Notification Service (SNS), and CloudWatch. When a single EC2 instance is misbehaving, it ought to be automatically killed and replaced, not fixed. When an application needs more resources, it should know how to provision them itself rather than needing an engineer to be paged in the middle of the night.
Interconnecting loosely-coupled components is how a systems architect properly designs for AWS. Trying to build something on EC2 without SOA in mind is about as productive (and fun) as playing with a single Lego brick.

Wednesday, January 29, 2014

How to enable logging for HAProxy in Linux

I am using Ubuntu12.04LTS for the installation, I assume that HAProxy is installed on system if not then do it from here

I follow the below step to setting up the logging:

Step1. In Global Section of HAProxy config file (haproxy.cfg) but the below

log 127.9.9.1 local0

Step2.  Create config file in /etc/rsyslog.d

$ sudo vim /etc/rsyslog.d/haproxy.conf

$ModLoad imudp
$UDPServerRun 514 
$template Haproxy,"%msg%\n"
local0.=info -/var/log/haproxy/haproxy.log;Haproxy
local0.notice -/var/log/haproxy/haproxy-status.log;Haproxy
### keep logs in localhost ##
local0.* ~ 

Step3.  Restart the HAProxy Server

$ sudo /etc/init.d/haproxy restart

Step 4: Now create the log rotate file for HAProxy, this keep on rotating and compress file itself. If this is not present in /etc/logrotate.d directory then create it as below:

$ sudo vim /etc/logrotate.d/haproxy

/var/log/haproxy/haproxy.log {
    missingok
    notifempty
    sharedscripts
    rotate 120
    daily
    compress
    postrotate
        reload rsyslog >/dev/null 2>&1 || true
    endscript

}

Step5. Restart the syslog

$ sudo restart rsyslog

you are done, check the HAProxy logs:

$ tail -f /var/log/haproxy/haproxy.log

Note:
120 are the days that this will overwrite after 120 days.
local0.=info -/var/log/haproxy.log defines the http log will be saved in haproxy.log
local0.notice -/var/log/haproxy-status.log defines the Server status like start,stop,restart,down,up etc. will be saved in haproxy-status.log

UDPServerRun 514 means opening UDP port no. 514 to listen haproxy messages


Friday, November 22, 2013

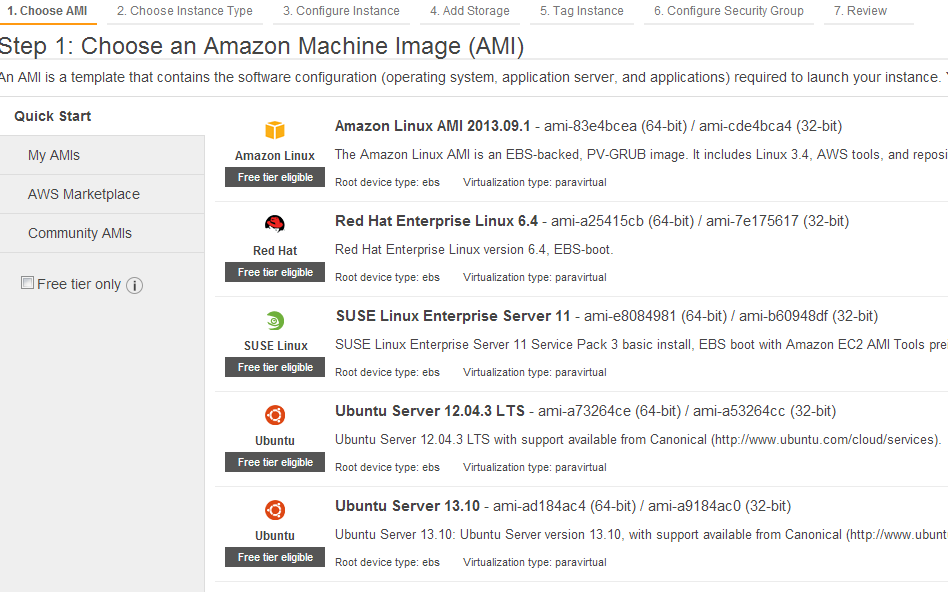
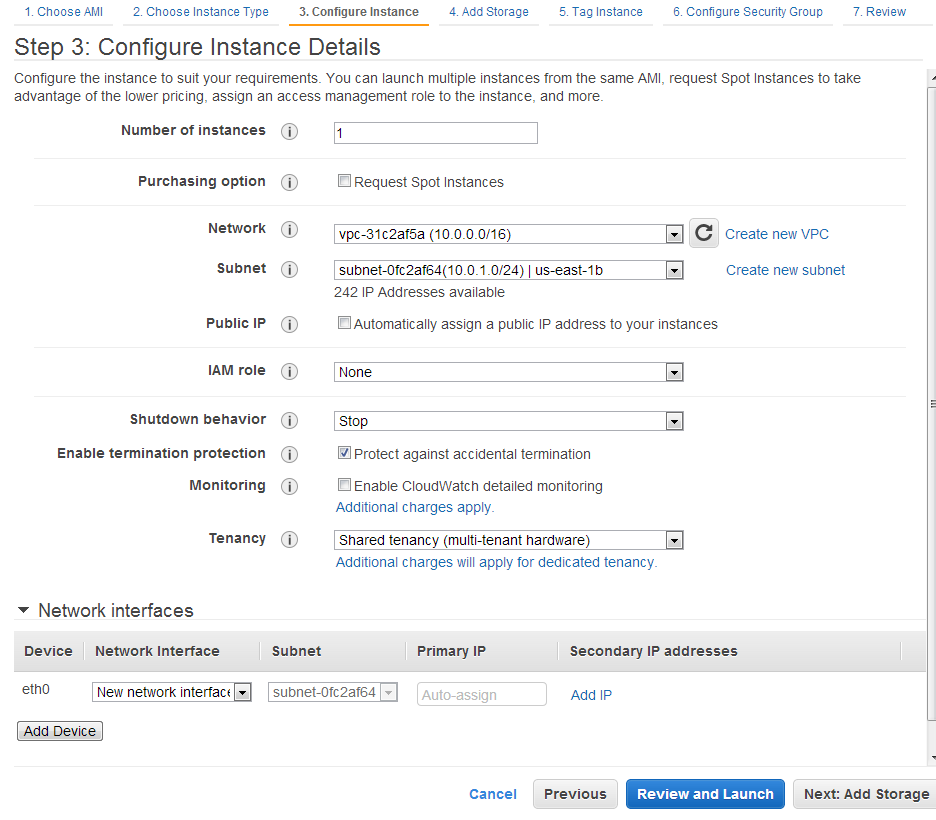
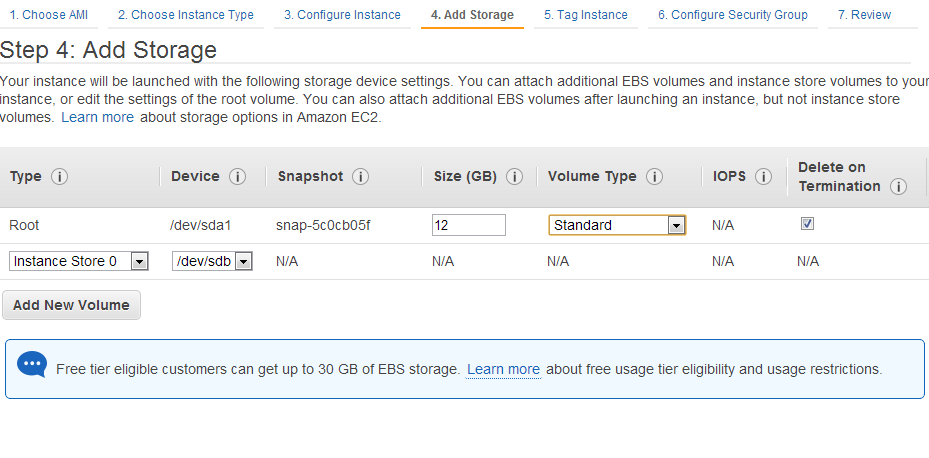
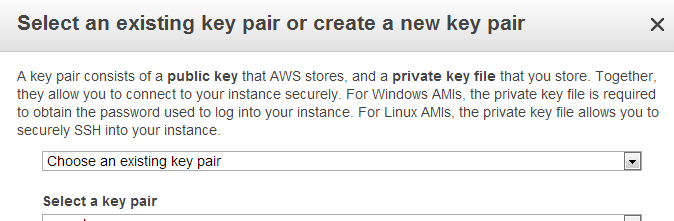
Launching New Instance on Amazon Cloud (AWS)

Lgoin to the AWS console and go to EC2 Dashboard, click instances


Now you would get the wizard to launch the process:

1. Select the desired reinstalled environment (Windows, Linux)


2. Choose the instance type such as m1.small, m1.medium as per the hardware requirment you need for the application you going to run on it


3. Configure the Instance details as number of instances, Network, Subnet and Public IP etc.


4. Add Storage, here you can add storage to the instance as per requirments


5. Now Choose the Security Group or you can configure it later time, give it a name and you can review it


 6. Choose the key pair for authentication


 Now you are good to go and your instance is ready to use.


Thursday, October 24, 2013

Recover/Reset MySQL root Password

Step1 : Stop mysql service

# /etc/init.d/mysqlsd stop

Step 2: Start to MySQL server without password:
# mysqld_safe --skip-grant-tables &
Output:

[1] 5988
Starting mysqld daemon with databases from /var/lib/mysql
mysqld_safe[6025]: started

Step 3: Connect to mysql server:
# mysql -u root
Output:

Welcome to the MySQL monitor. Commands end with ; or \g.
Your MySQL connection id is 1 to server version: 4.1.15-Debian_1-log
Type 'help;' or '\h' for help. Type '\c' to clear the buffer.
mysql>

Step 4: Setup new MySQL root user password
mysql> use mysql;
mysql> update user set password=PASSWORD("NEW-MySQL_ROOT-PASSWORD") where User='root';
mysql> flush privileges;
mysql> quit

Step 5: Stop MySQL Server:
# /etc/init.d/mysql stop
Output:

Stopping MySQL database server: mysqld
STOPPING server from pid file /var/run/mysqld/mysqld.pid
mysqld_safe[6186]: ended
[1]+ Done mysqld_safe --skip-grant-tables

Step 6: Start MySQL server:
# /etc/init.d/mysqld start
# mysql -u root -p

and now you can log in with your new password!

Friday, September 6, 2013

Jetty Web Server on CentOS 6


Download Jetty 7 from the website http://www.eclipse.org/jetty/. I have decided to install Jetty located at /srv rather than /opt but you can install it anywhere you like. I ran the following commands to help with the installation.

#cd /srv


wget http://download.eclipse.org/jetty/7.4.5.v20110725/dist/jetty-distribution-7.4.5.v20110725.tar.gz


#tar zxf jetty-distribution-7.4.5.v20110725.tar.gz


#ln -s jetty-distribution-7.4.5.v20110725 jetty


The last command just creates a link from the directory jetty to the directory created when you extracted the tar archive. Next I shall show you how to create a user to run Jetty with. You can also make it run on startup automatically so that when you reboot you do not need to start it.


#adduser -r -m jetty

#chown -R jetty:jetty /srv/jetty

#cd /etc/init.d

#ln -s /srv/jetty/bin/jetty.sh jetty

#chkconfig --add jetty

#chkconfig --level 345 jetty on


You will need to add some values so that Jetty can find your default java install and to set the port which you wish to add jetty to. You can add these values to either jetty.sh or /etc/default/jetty which is the preferred way of configuring applications on Linux.


You should now be able to start Jetty freely with the following command.


#service jetty start

Wednesday, July 10, 2013

Setting up the Subversion Sync between two Server (Primary-Secondary)


I assume that you have working Primary Subversion Server.  I also assume that you have new Subversion Server that would act as a Secondary Server. All the action should be done on Secondary Server.

Primary Server: https://svn.vaseem/svn/reponame/
Secondary Server: https://svn.vaseem2.com/svn/reponame/
     
1.  Create the repo (claimcolony) with the following command or by GUI
svnadmin create "C:\Repositories\reponame”
we can check the revision and other information by the following command
svn info https://svn.vaseem.com/svn/reponame/
Path: igdbatchtool
URL: https://svn.vaseem/svn/xyzrepo
Repository Root: https://svn.vaseem/svn/xyzrepo
Repository UUID: aaac7bac-4d54-a44b-87f7-7681aaadcd9b
Revision: 0
Node Kind: directory
Last Changed Rev: 0
Last Changed Date: 2012-07-06 05:55:11 -0700 (Fri, 06 Jul 2012)
   
2.  Check the UUID of created repo with
svn info https://svn.vaseem/svn/xyzrepo/

set the same UUID for the newly created repo as of Primary repo by command

svnadmin setuuid  /path/of/repo/  UUID of Primary repo
svnadmin setuuid "D:\Repositories\xyzrepo" db5423f0-d7e9-4b4a-b701-935fb5d42e4b
     
3.  Initialize the sync from Primary repository by the below command
svnsync initialize DEST_URL SOURCE_URL
this will throw errors so we need to go to the mirror (secondary) repo and need to change the pre-revporp-change hook to change so that it can accept the change


Now initialize the sync for repository
svnsync initialize DEST_URL SOURCE_URL
svnsync initialize https://svn.vaseem.com/svn/xyzrepo/
https://svn.vaseem2.com/svn/xyzrepo/

Now start sync
svnsync sync DEST_URL SOURCE_URL

svnsync sync https://svn.vaseem.com/svn/xyzrepo/
https://svn.vaseem2.com/svn/xyzrepo/
this will start syncing…


JIRA Installation and Configuration


Step 1. Installation postgresql 

yum install postgresql postgresql-server

[root@TPAEXZSLRD01 opt]# yum install postgresql postgresql-server
Loaded plugins: fastestmirror, security
Determining fastest mirrors
 * base: mirror.us.leaseweb.net
 * extras: mirror.umd.edu
 * updates: mirror.cs.vt.edu
base                                                                                                                  | 3.7 kB     00:00
base/primary_db                                                                                                       | 4.4 MB     00:05
extras                                                                                                                | 3.5 kB     00:00
extras/primary_db                                                                                                     |  19 kB     00:00
updates                                                                                                               | 3.5 kB     00:00
updates/primary_db                                                                                                    | 2.5 MB     00:01
Setting up Install Process
Resolving Dependencies
--> Running transaction check
---> Package postgresql.x86_64 0:8.4.13-1.el6_3 will be installed
--> Processing Dependency: postgresql-libs(x86-64) = 8.4.13-1.el6_3 for package: postgresql-8.4.13-1.el6_3.x86_64
--> Processing Dependency: libpq.so.5()(64bit) for package: postgresql-8.4.13-1.el6_3.x86_64
---> Package postgresql-server.x86_64 0:8.4.13-1.el6_3 will be installed
--> Running transaction check
---> Package postgresql-libs.x86_64 0:8.4.13-1.el6_3 will be installed
--> Finished Dependency Resolution

Dependencies Resolved

=============================================================================================================================================
 Package                                 Arch                         Version                               Repository                  Size
=============================================================================================================================================
Installing:
 postgresql                              x86_64                       8.4.13-1.el6_3                        base                       2.8 M
 postgresql-server                       x86_64                       8.4.13-1.el6_3                        base                       3.4 M
Installing for dependencies:
 postgresql-libs                         x86_64                       8.4.13-1.el6_3                        base                       200 k

Transaction Summary
=============================================================================================================================================
Install       3 Package(s)

Total download size: 6.4 M
Installed size: 29 M
Is this ok [y/N]: Y
Downloading Packages:
(1/3): postgresql-8.4.13-1.el6_3.x86_64.rpm                                                                           | 2.8 MB     00:02
(2/3): postgresql-libs-8.4.13-1.el6_3.x86_64.rpm                                                                      | 200 kB     00:00
(3/3): postgresql-server-8.4.13-1.el6_3.x86_64.rpm                                                                    | 3.4 MB     00:02
---------------------------------------------------------------------------------------------------------------------------------------------
Total                                                                                                        1.1 MB/s | 6.4 MB     00:05
Running rpm_check_debug
Running Transaction Test
Transaction Test Succeeded
Running Transaction
  Installing : postgresql-libs-8.4.13-1.el6_3.x86_64                                                                                     1/3
  Installing : postgresql-8.4.13-1.el6_3.x86_64                                                                                          2/3
  Installing : postgresql-server-8.4.13-1.el6_3.x86_64                                                                                   3/3
  Verifying  : postgresql-server-8.4.13-1.el6_3.x86_64                                                                                   1/3
  Verifying  : postgresql-libs-8.4.13-1.el6_3.x86_64                                                                                     2/3
  Verifying  : postgresql-8.4.13-1.el6_3.x86_64                                                                                          3/3

Installed:
  postgresql.x86_64 0:8.4.13-1.el6_3                                postgresql-server.x86_64 0:8.4.13-1.el6_3

Dependency Installed:
  postgresql-libs.x86_64 0:8.4.13-1.el6_3

Complete!
[root@TPAEXZSLRD01 opt]# chkconfig postgresql on
[root@TPAEXZSLRD01 opt]# service postgresql start

/var/lib/pgsql/data is missing. Use "service postgresql initdb" to initialize the cluster first.
                                                           [FAILED]
[root@TPAEXZSLRD01 opt]# ^C
[root@TPAEXZSLRD01 opt]# service postgresql initdb
Initializing database:                                     [  OK  ]
[root@TPAEXZSLRD01 opt]#service postgresql start
Starting postgresql service:                               [  OK  ]
[root@TPAEXZSLRD01 opt]# vim /etc/sysconfig/iptables
[root@TPAEXZSLRD01 opt]# /etc/init.d/iptables restart
iptables: Flushing firewall rules:                         [  OK  ]
iptables: Setting chains to policy ACCEPT: filter          [  OK  ]
iptables: Unloading modules:                               [  OK  ]
iptables: Applying firewall rules:


CREATE USER jirauser WITH PASSWORD 'password';

CREATE DATABASE jiradb;

GRANT ALL PRIVILEGES ON DATABASE jiradb to jirauser;


Error connecting to database

FATAL: Ident authentication failed for user "jirauser"

#vim /var/lib/pgsql/data/pg_hba.conf

# "local" is for Unix domain socket connections only
local   all         all                               trust
# IPv4 local connections:
host    all         all         127.0.0.1/32          trust
host    all         all        10.10.0.2 255.255.255.0 trust
# IPv6 local connections:
#host    all         all         ::1/128               md5
host all all 0.0.0.0 0.0.0.0 trust


Step 2: Installation of JIRA

This will install JIRA 4.4.1 on your computer.
OK [o, Enter], Cancel [c]

If JIRA is already installed on this machine, please read the following information carefully.
Please choose between creating a new JIRA installation or upgrading an
existing JIRA installation.
Create a new JIRA installation. [1, Enter], Upgrade an existing JIRA installation. [2]
2
Existing JIRA installation directory:
[/opt/JIRA]

No directory found in specified location
Finishing installation ...
[root@moscow opt]# ./atlassian-jira-4.4.1-x32.bin
Unpacking JRE ...
Starting Installer ...

This will install JIRA 4.4.1 on your computer.
OK [o, Enter], Cancel [c]

If JIRA is already installed on this machine, please read the following information carefully.
Please choose between creating a new JIRA installation or upgrading an
existing JIRA installation.
Create a new JIRA installation. [1, Enter], Upgrade an existing JIRA installation. [2]
1

Where should JIRA 4.4.1 be installed?
[/opt/atlassian/jira]

Default location for JIRA data
[/var/atlassian/application-data/jira]

Configure which ports JIRA will use.
JIRA requires two TCP ports that are not being used by any other
applications on this machine. The HTTP port is where you will access JIRA
through your browser. The Control port is used to Startup and Shutdown JIRA.
Use default ports (HTTP: 8080, Control: 8005) - Recommended [1, Enter], Set custom value for HTTP and Control ports [2]

JIRA can be run in the background.
You may choose to run JIRA as a service, which means it will start
automatically whenever the computer restarts.
Install JIRA as Service?
Yes [y, Enter], No [n]
y

Extracting files ...


Please wait a few moments while JIRA starts up. Depending on your system this may take a few minutes.
Launching JIRA ...

Setup has finished installing JIRA 4.4.1 on your computer.
JIRA 4.4.1 can be accessed at http://localhost:8080
Finishing installation ...

Step 3: Configuration of JIRA

Launch the browser and access the JIRA: http://localhost:8080