When using the SSL Endpoint feature for non-production applications, you can avoid the costs associated with the SSL certificate by using a self-signed SSL certificate. Though the certificate implements full encryption, visitors to your site will see a browser warning indicating that the certificate should not be trusted.
In order to successfully install an SSL certificate you need the following things
CSR file
Private key
Certificate key
I am assuming the below,
Domain Name: testssl.com
A private key and certificate signing request are required to create an SSL certificate. I am going to use 'openssl req' to generate the certificates.
Initiate a CSR
openssl req -new -newkey rsa:2048 -nodes -keyout testssl.key -out testssl.csr
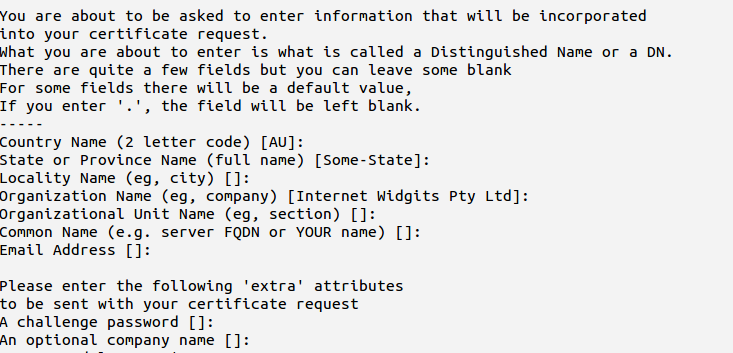
After this command you need to provide the details about the organization and what type (wildcard or subdomain) of certificate you are going to generate. You can hit enter for a “challenge password”, leaving the password empty.

Now you have completed generating the private key and the CSR.
This will create below files
testssl.csr--will be used in creating certificate
testssl.key--> Private key (need to convert in pem format)
Generate SSL certificate
The self-signed SSL certificate is generated from the testssl.key private key and testssl.csr files.
openssl x509 -req -days 365 -in testssl.csr -signkey testssl.key -out testssl.crt
The testssl.crt file is your site certificate for use with SSL add-on along with the testssl.key private key.
Applying on HAProxy:
In most cases, you can simply combine your SSL certificate (.crt or .cer file provided by a certificate authority) and its respective private key (.key file, generated by you). Assuming your certificate file is called testssl.crt, and your private key file is called testssl.key, here is an example of how to combine the files:
cat testssl.crt testssl.key > testssl.pem
sudo cp testssl.pem /etc/ssl/private/
This creates the combined PEM file, called example.pem and copies it to /etc/ssl/private. As always, be sure to secure any copies of your private key file, including the PEM file (which contains the private key).
If the above method doesn't work then you can convert your file to PEM format like belwo:
openssl rsa -in testssl.key -outform PEM -out testssl.pem
openssl x509 -inform PEM -in testssl.crt -out testssl-cert.pem
Combined these two and put in HAProxy config file e.g.
cat testssl-crt.pem testssl.pem > testssl.pem
Edit HAProxy config file and add the certificate
vim /etc/haproxy/haproxy.cfg
frontend localhost
bind *:80
bind *:443 ssl crt /etc/ssl/private/testssl.pem
mode http
default_backend nodes
In order to successfully install an SSL certificate you need the following things
CSR file
Private key
Certificate key
I am assuming the below,
Domain Name: testssl.com
A private key and certificate signing request are required to create an SSL certificate. I am going to use 'openssl req' to generate the certificates.
Initiate a CSR
openssl req -new -newkey rsa:2048 -nodes -keyout testssl.key -out testssl.csr
After this command you need to provide the details about the organization and what type (wildcard or subdomain) of certificate you are going to generate. You can hit enter for a “challenge password”, leaving the password empty.

Now you have completed generating the private key and the CSR.
This will create below files
testssl.csr--will be used in creating certificate
testssl.key--> Private key (need to convert in pem format)
Generate SSL certificate
The self-signed SSL certificate is generated from the testssl.key private key and testssl.csr files.
openssl x509 -req -days 365 -in testssl.csr -signkey testssl.key -out testssl.crt
The testssl.crt file is your site certificate for use with SSL add-on along with the testssl.key private key.
Applying on HAProxy:
In most cases, you can simply combine your SSL certificate (.crt or .cer file provided by a certificate authority) and its respective private key (.key file, generated by you). Assuming your certificate file is called testssl.crt, and your private key file is called testssl.key, here is an example of how to combine the files:
cat testssl.crt testssl.key > testssl.pem
sudo cp testssl.pem /etc/ssl/private/
This creates the combined PEM file, called example.pem and copies it to /etc/ssl/private. As always, be sure to secure any copies of your private key file, including the PEM file (which contains the private key).
If the above method doesn't work then you can convert your file to PEM format like belwo:
openssl rsa -in testssl.key -outform PEM -out testssl.pem
openssl x509 -inform PEM -in testssl.crt -out testssl-cert.pem
Combined these two and put in HAProxy config file e.g.
cat testssl-crt.pem testssl.pem > testssl.pem
Edit HAProxy config file and add the certificate
vim /etc/haproxy/haproxy.cfg
frontend localhost
bind *:80
bind *:443 ssl crt /etc/ssl/private/testssl.pem
mode http
default_backend nodes
No comments:
Post a Comment