Wednesday, August 17, 2016

VirtualBox kernel modules do not match this version error (RTR3InitEx failed with rc=-1912 (rc=-1912) )

I have successfully fixed the issue in my Ubuntu 16.04.1 LTS
Check the package
dpkg -l | grep -i virtualbox

Uninstall from system
sudo apt-get remove unity-scope-virtualbox
sudo apt-get update && sudo apt-get remove --purge virtualbox-5.1

wget -q https://www.virtualbox.org/download/..._vbox_2016.asc -O- | sudo apt-key add -
wget -q https://www.virtualbox.org/download/oracle_vbox.asc -O- | sudo apt-key add -

Finally install it:

sudo apt-get update
sudo apt-get install virtualbox-5.1


This fixed the issue for me 

Thursday, May 19, 2016

Generating Self Signed Certificate

When using the SSL Endpoint feature for non-production applications, you can avoid the costs associated with the SSL certificate by using a self-signed SSL certificate. Though the certificate implements full encryption, visitors to your site will see a browser warning indicating that the certificate should not be trusted.

In order to successfully install an SSL certificate you need the following things

CSR file
Private key
Certificate key

I am assuming the below,

Domain Name: testssl.com

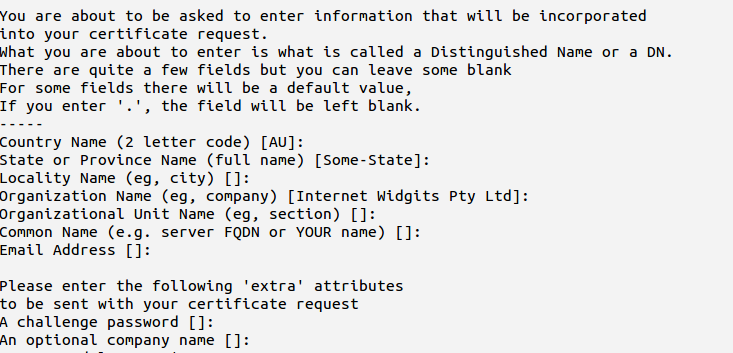
A private key and certificate signing request are required to create an SSL certificate. I am going to use 'openssl req' to generate the certificates.

Initiate a CSR

openssl req -new -newkey rsa:2048 -nodes -keyout testssl.key -out testssl.csr

After this command you need to provide the details about the organization and what type (wildcard or subdomain) of certificate you are going to generate. You can hit enter for a “challenge password”, leaving the password empty.


Now you have completed generating the private key and the CSR.

This will create below files

testssl.csr--will be used in creating certificate
testssl.key--> Private key (need to convert in pem format)

Generate SSL certificate
The self-signed SSL certificate is generated from the testssl.key private key and testssl.csr files.

openssl x509 -req -days 365 -in testssl.csr -signkey testssl.key -out testssl.crt

The testssl.crt file is your site certificate for use with SSL add-on along with the testssl.key private key.

Applying on HAProxy:

In most cases, you can simply combine your SSL certificate (.crt or .cer file provided by a certificate authority) and its respective private key (.key file, generated by you). Assuming your certificate file is called testssl.crt, and your private key file is called testssl.key, here is an example of how to combine the files:

cat testssl.crt testssl.key > testssl.pem
sudo cp testssl.pem /etc/ssl/private/

This creates the combined PEM file, called example.pem and copies it to /etc/ssl/private. As always, be sure to secure any copies of your private key file, including the PEM file (which contains the private key).

If the above method doesn't work then you can convert your file to PEM format like belwo:

openssl rsa -in testssl.key -outform PEM -out testssl.pem

openssl x509 -inform PEM -in testssl.crt -out testssl-cert.pem

Combined these two and put in HAProxy config file e.g.

cat testssl-crt.pem testssl.pem > testssl.pem

Edit HAProxy config file and add the certificate

vim /etc/haproxy/haproxy.cfg

frontend localhost
    bind *:80
    bind *:443 ssl crt /etc/ssl/private/testssl.pem
    mode http
    default_backend nodes


Friday, January 15, 2016

Installing the AWS Command Line Interface on Linux

This section discusses various ways to install the AWS CLI.

Note:
The AWS CLI comes pre-installed on the Amazon Linux AMI. Run sudo yum update after connecting to the instance to get the latest version of the package available via yum. If you need a more recent version of the AWS CLI than what is available in the Amazon updates repository, uninstall the package (sudo yum remove aws-cli) and then install using pip.

Note:
The awscli package may be available in repositories for other package managers such as APT, yum and Homebrew, but it is not guaranteed to be the latest version. To make sure you have the latest version, use one of the installation methods described here.

like installation on ubuntu you can execute the below command
$sudo apt-get install aws-cli

Install the AWS CLI Using Pip

Pip is a Python-based tool that offers convenient ways to install, upgrade, and remove Python packages and their dependencies. Pip is the recommended method of installing the CLI on Mac and Linux.

Prerequisites

Windows, Linux, OS X, or Unix
Python 2 version 2.6.5+ or Python 3 version 3.3+
Pip
First, check to see if you already have Python installed:

$ python --version

Install the AWS CLI Using pip

With Python and pip installed, use pip to install the AWS CLI:

Linux, OS X, or Unix

$ sudo pip install awscli

To upgrade an existing AWS CLI installation, use the --upgrade option:

$ sudo pip install --upgrade awscli
Pip installs the aws executable to /usr/bin/aws. The awscli library (which does the actual work) is installed to the 'site-packages' folder in Python's installation directory.

Install the AWS CLI Using the Bundled Installer (Linux, OS X, or Unix)

If you are on Linux, OS X, or Unix, you can also use the bundled installer to install the AWS CLI. The bundled installer handles all the details in setting up an isolated environment for the AWS CLI and its dependencies. You don't have to be fluent in advanced pip/virtualenv usage, nor do you have to worry about installing pip.

Prerequisites

Linux, OS X, or Unix
Python 2 version 2.6.5+ or Python 3 version 3.3+
Check your Python installation:

$ python --version

Install the AWS CLI Using the Bundled Installer

Follow these steps from the command line to install the AWS CLI using the bundled installer.

To install the AWS CLI using the bundled installer

Download the AWS CLI Bundled Installer using wget or curl.

Unzip the package.

Run the install executable.

On Linux and OS X, here are the three commands that correspond to each step:

$ curl "https://s3.amazonaws.com/aws-cli/awscli-bundle.zip" -o "awscli-bundle.zip"
$ unzip awscli-bundle.zip
$ sudo ./awscli-bundle/install -i /usr/local/aws -b /usr/local/bin/aws
If you don't have unzip, use your Linux distribution's built in package manager to install it, typically with either sudo yum install unzip or sudo apt-get install unzip.

Configuring the AWS Command Line Interface

This section explains how to configure settings that the AWS Command Line Interface uses when interacting with AWS, such as your security credentials and the default region.

$ aws configure
AWS Access Key ID [None]: AKIAIOSFODNN7EXAMPLE
AWS Secret Access Key [None]: wJalrXUtnFEMI/K7MDENG/bPxRfiCYEXAMPLEKEY
Default region name [None]: us-west-2
Default output format [None]: ENTER
To use this example, type aws configure at the command line and press Enter. aws configure is the command. This command is interactive, so the AWS CLI outputs lines of texts, prompting you to enter additional information. Enter each of your access keys in turn and press Enter. Then, enter a region name in the format shown, press Enter, and press Enter a final time to skip the output format setting. The final Enter command is shown as replaceable text because there is no user input for that line

Configuration and Credential Files

The CLI stores credentials specified with aws configure in a local file named credentials in a folder named .aws in your home directory. Home directory location varies but can be referred to using the environment variables %UserProfile% in Windows and $HOME or ~ (tilde) in Unix-like systems.

For example, the following commands list the contents of the .aws folder:

Linux, OS X, or Unix

$ ls  ~/.aws
The files generated by the CLI for the profile configured in the previous section look like this:

~/.aws/credentials

[default]
aws_access_key_id=AKIAIOSFODNN7EXAMPLE
aws_secret_access_key=wJalrXUtnFEMI/K7MDENG/bPxRfiCYEXAMPLEKEY
~/.aws/config

[default]
region=ap-southeast-1a
output=json

AWS Command line is installed and configured, you can check by typing
$aws help

Wednesday, October 21, 2015

Error while connecting to host from Ansible

Below error message I receive while trying to run(ping) command from Ansible master to hosts:

ubuntu@master:~/.ssh$ ansible 10.0.3.90 -m ping -k -u ubuntu
SSH password:
10.0.3.90 | FAILED >> {
    "failed": true,
    "msg": "/bin/sh: 1: /usr/bin/python: not found\r\nOpenSSH_6.6.1, OpenSSL 1.0.1f 6 Jan 2014\r\ndebug1: Reading configuration data /etc/ssh/ssh_config\r\ndebug1: /etc/ssh/ssh_config line 19: Applying options for *\r\ndebug1: auto-mux: Trying existing master\r\ndebug1: mux_client_request_session: master session id: 2\r\nShared connection to 10.0.3.90 closed.\r\n",
    "parsed": false
}


It seems from the error message that python is not installed on the machine. 

check python -v 

install via below command

$sudo apt-get install python-support

Now I executed the command again, this time it worked!

ubuntu@master:~/.ssh$ ansible 10.0.3.90 -m ping -u ubuntu
10.0.3.90 | success >> {
    "changed": false, 
    "ping": "pong"
}


Friday, September 18, 2015

Can’t locate Sys/Statistics/Linux.pm in @INC in Nagios plugin

Following is complete error, while I was executing Nagios plugin,

Can't locate Sys/Statistics/Linux.pm in @INC (you may need to install the Sys::Statistics::Linux module) (@INC contains: /usr/lib/nagios/plugins /etc/perl /usr/local/lib/perl/5.18.2 /usr/local/share/perl/5.18.2 /usr/lib/perl5 /usr/share/perl5 /usr/lib/perl/5.18 /usr/share/perl/5.18 /usr/local/lib/site_perl .) at /usr/lib/nagios/plugins/check_linux_stats.pl line 35.

After searching on internet I found that a perl module called “libsys-statistics-linux-perl” and which is missing in my machine.

Since I am using Ubuntu 14.04, I installed libsys-statistics-linux-perl module with apt-get by using following command:

$ apt-get install libsys-statistics-linux-perl

Tuesday, July 14, 2015

SSH Agent forwarding on Ubuntu 14.04

Use Case: You have got some server in cloud that are not exposed to internet directly. You have one server called (bastion host) by which you can login to the back end servers.

You can login to the bastion host and from there, you can login to the rest of the server that are not exposed to internet. In this way you need to keep the files on bastion host that is not good.

With the help of agent forwarding you don't need to store private key on bastion host, key will be on your local machine and via ssh agent-forwarding the same key would be used to login to the back end server.

I believe that you already know how to login to linux server with key authentication. If not then you can find it here

I assume that you already have setup login via private key on destination server.

I assume that you got host1(client) bastion(middle Server, bastion host) and server1 (Destination Server). With the help of SSH Agent forwarding I can login from host1>bastion>server1 without storing any private key on bastion.
From a network perspective, you ideally want your private servers only accessible via a bastion host or other intermediary host that doesn't contain any of private key.

On Server: You don't need to do anything if you have setup login via private/public key authentication

On Client:
Add your key to your ssh deamon
$ ssh-add "/home/keys/private.pem"
You will receive the below out put
$ ssh-add /home/keys/private.pem
Identity added: /home/keys/private.pem (/home/keys/private.pem)

You may allow Agent forwarding in sshd_config file or can issue in command as well
You can specify -A in ssh command to use agent forwarding

SSH Client configuration
The SSH clients should be configured to allow agent forwarding. The following entry should be added in/etc/ssh/ssh_config file to apply this change for all users in the server, or /home/user/.ssh/config file to apply this change only to specific user.

Host *
    ForwardAgent yes
The above enable agent forwarding from all hosts. It is an aggressive setting. You may want to restrict it to specific hosts depending on your use case.

ssh -At bastion.example.com ssh server1.example.com

This will take you to server1.example.com

How to Setup and Secure Linux SSH Logins to use Private PEM Keys

SSH logins are susceptible to brute force attacks. A thousand things can go wrong which could give someone unauthorized access to your server. The best way to secure your SSH login is to use Public/Private PEM keys. This is default login type for Amazon EC2 servers. Unfortunately Amazon’s interface only created a single account. This tutorial will show you how to setup additional PEM keys for other users.
Once you’ve logged into your server, do the following:
Step 1: New Account setup
Here we will create the new account, and add them to the sudoers group.
sudo adduser user1
sudo su
passwd user1
visudo
Optional: Add the user to Sudoers
visudo
#add this to the last line
1 user1   ALL = (ALL)    ALL
Step 2: Generate the Public/Private key files
Now we will create the public and private key files for user1
su user1
#Enter the password
cd ~/
ssh-keygen -b 2048 -t rsa -f user1
mkdir .ssh
chmod 700 .ssh
cat user1.pub >> .ssh/authorized_keys
chmod 600 .ssh/authorized_keys
chown 600 user1 .ssh
chown user1 .ssh/authorized_keys

Step 3: Download your private key
If you key is not in .pem format you can change it via below command
openssl rsa -in user1 -outform PEM -out user1.pem
You will now have to download, or copy the contents of your private pem file.
If you are going to copy the contents of the file to a key file on your local system, just copy and paste the data into a new file.
Before using your key, make sure to change the permissions to 600.
chmod 600 user1.pem
Step 4: Test your SSH Login
Now let’s test our password-less login to make sure the private pem files are working.
ssh -i /path/to/file/user1.pem user1@server1.exampledomain.com
That should do it! Hope you find this tutorial workable.

Tuesday, May 19, 2015

Fixes for Puppet Enterprise 8 (!! ERROR: The puppet master service failed to start within 120 seconds; unable to proceed)

I was getting this error while installing PE8 on Ubuntu 14.04

!! ERROR: The puppet master service failed to start within 120 seconds; unable to proceed*

Install the below package before you run the puppet installer:

apt-get install zlib1g-dev build-essential libssl-dev libreadline-dev libyaml-dev libsqlite3-dev sqlite3 libxml2-dev libxslt1-dev libcurl4-openssl-dev python-software-properties

This fixed the issue for me and PE8 got installed successfully.