Sunday, June 10, 2018

Setting up CloudWatch with your EC2 Instances on AWS with CloudWatch Agent

Requirement

  • IAM Roles for the Instance to run with AmazonSSMFullAccess
  • AWS System Manager, AmazonEC2RoleforSSM Policy attached to your user
  • Install or Update the SSM Agent
  • AWS CloudWatch Agent
  • Your AWS Instance must have internet access or direct access to CloudWatch so the data can be pushed to CloudWatch
Create IAM Roles to Use with CloudWatch Agent on Amazon EC2 Instances

The first procedure creates the IAM role that you need to attach to each Amazon EC2 instance that runs the CloudWatch agent. This role provides permissions for reading information from the instance and writing it to CloudWatch.

The second procedure creates the IAM role that you need to attach to the Amazon EC2 instance being used to create the CloudWatch agent configuration file, if you are going to store this file in Systems Manager Parameter Store so that other servers can use it. This role provides permissions for writing to Parameter Store, in addition to the permissions for reading information from the instance and writing it to CloudWatch. This role includes permissions sufficient to run the CloudWatch agent as well as to write to Parameter Store.


To create the IAM role necessary for each server to run CloudWatch agent

Sign in to the AWS Management Console and open the IAM console at https://console.aws.amazon.com/iam/.

In the navigation pane on the left, choose Roles, Create role.

For Choose the service that will use this role, choose EC2 Allows EC2 instances to call AWS services on your behalf. Choose Next: Permissions.

In the list of policies, select the check box next to CloudWatchAgentServerPolicy. Use the search box to find the policy, if necessary.

If you will use SSM to install or configure the CloudWatch agent, select the check box next to AmazonEC2RoleforSSM. Use the search box to find the policy, if necessary. This policy is not necessary if you will start and configure the agent only through the command line.

Choose Next: Review

Confirm that CloudWatchAgentServerPolicy and optionally AmazonEC2RoleforSSM appear next to Policies. In Role name, type a name for the role, such as CloudWatchAgentServerRole. Optionally give it a description, and choose Create role.

The role is now created.


The following procedure creates the IAM role that can also write to Parameter Store. You need to use this role if you are going to store the agent configuration file in Parameter Store so that other servers can use it.

To create the IAM role necessary for an administrator to save an agent configuration file to Systems Manager Parameter Store

Sign in to the AWS Management Console and open the IAM console at https://console.aws.amazon.com/iam/.

In the navigation pane on the left, choose Roles, Create role.

For Choose the service that will use this role, choose EC2 Allows EC2 instances to call AWS services on your behalf. Choose Next: Permissions.

In the list of policies, select the check box next to CloudWatchAgentAdminPolicy. Use the search box to find the policy, if necessary.

If you will use SSM to install or configure the CloudWatch agent, select the check box next to AmazonEC2RoleforSSM. Use the search box to find the policy, if necessary. This policy is not necessary if you will start and configure the agent only through the command line.

Choose Next: Review

Confirm that CloudWatchAgentAdminPolicy and optionally AmazonEC2RoleforSSM appear next to Policies. In Role name, type a name for the role, such as CloudWatchAgentAdminRole. Optionally give it a description, and choose Create role.

The role is now created.

Install or Update the SSM Agent

Before you can use Systems Manager to install the CloudWatch agent, you must make sure that the instance is configured correctly for Systems Manager.

SSM Agent is installed, by default, on Amazon Linux base AMIs dated 2017.09 and later. SSM Agent is also installed, by default, on Amazon Linux 2 and Ubuntu Server 18.04 LTS AMIs. Here is the documentation to install the agent on various version.

Attach an IAM Role to the Instance

An IAM role for the instance profile is required when you install the CloudWatch agent on an Amazon EC2 instance. This role enables the CloudWatch agent to perform actions on the instance. Use one of the roles you created earlier. 

If you are going to use this instance to create the CloudWatch agent configuration file and copy it to Systems Manager Parameter Store, use the role you created that has permissions to write to Parameter Store. This role may be called CloudWatchAgentAdminRole.

For all other instances, select the role that includes just the permissions needed to install and run the agent. This role may be called CloudWatchAgentServerRole.

Installing CloudWatch Agent on your Linux Instances
  • Navigate to your EC2 section 
  • In the navigation pane, choose Run Command.
  • In the Command document list, choose AWS-ConfigureAWSPackage
  • In the Targets area, choose the instance or multiple instances on which to install the CloudWatch agent. If you do not see a specific instance, it might not be configured for Run Command.
  • In the Action list, choose Install.
  • In the Name field, type AmazonCloudWatchAgent.
  • Leave Version set to latest to install the latest version of the agent.
  • Choose Run.
  • Optionally, in the Targets and outputs areas, select the button next to an instance name and choose View output. Systems Manager should show that the agent was successfully installed.

Optionally You can use an Amazon S3 download link to download the CloudWatch agent package on an Amazon EC2 instance server.

To use the command line to install the CloudWatch agent on an Amazon EC2 instance

Download the CloudWatch agent. For a Linux server, type the following:

wget https://s3.amazonaws.com/amazoncloudwatch-agent/linux/amd64/latest/AmazonCloudWatchAgent.zip

Unzip the package.

unzip AmazonCloudWatchAgent.zip

Install the package. On a Linux server, change to the directory containing the package and type:

sudo ./install.sh


Create the CloudWatch Agent Configuration File with the Wizard

Start the CloudWatch agent configuration wizard by typing the following:

sudo /opt/aws/amazon-cloudwatch-agent/bin/amazon-cloudwatch-agent-config-wizard

If you are going to use Systems Manager to install and configure the agent, be sure to answer Yes when prompted whether to store the file in Systems Manager Parameter Store. You can also choose to store the file in Parameter Store even if you aren't using the SSM Agent to install the CloudWatch agent. To be able to store the file in Parameter Store, you must use an IAM role with sufficient permissions. For more information, see Create IAM Roles and Users for Use With CloudWatch Agent.


Deploying CloudWatch Configuration File

We will now deploy cloud watch configuration to the client (the instances which we need to monitor)
  • In the navigation pane, choose Run Command.
  • Click on Run Command once the page loads up 
  • In the Command document list, choose AmazonCloudWatch-ManageAgent
  • In the Targets area, choose the instance or multiple instances on which you want to deploy CloudWatch Configuration on
  • Under Action select configure 
  • Under Mode leave it as ec2
  • Change the Optional Configuration Source to ssm
  • Under Optional Configuration Location enter the exact same name of the parameter you created in the Parameter Store (previous section). In this example, the parameter is called CloudWatchLinux
  • Optional Restart should be set to Yes (This will restart the CloudWatch agent, not the instance)
  • Now click on Run

Now go to Cloudwatch and you would start receiving custom metrics that you defined in CloudWatch Configuration.

Friday, March 9, 2018

About Kubernetes and it's Architecture

Kubernetes more frequently pronounced as (K8s) it’s an open source container orchestration platform designed for running distributed applications and services at scale. It was originally designed by Google and is now maintained by the Cloud Native Computing Foundation

Kubernetes components can be logically split up into these two categories:

  • Master (Control Panel): These components run on the master nodes of the cluster and form the control plane.
  • Node (Worker): Applications and services running on the worker nodes to receive instructions and run containers.
Master (Control Plane) has following components. These components are responsible for maintaining the state of the cluster:
  1. etcd
  2. API Server.
  3. Controller Manager
  4. SchedulerEvery worker node consists of the following components. 
Every worker node consists of the following components. These components are responsible for deploying and running the application containers.
  1. Kubelet
  2. Container Runtime (Docker etc)
These components are responsible for deploying and running the application containers.


Let’s discuss more about Master components one by one

etcd 

It is a simple, key value storage which is used to store the kubernetes cluster data (such as number of pods, their states, namespaces etc). in simple words, it is the database of kubernetes. It is only accessible from the API server for security reasons. etcd enables notifications to the cluster about configuration changes with the help of watchers. Notifications are API requests on each etcd cluster node to trigger the update of information in the node’s storage.

kube-apiserver

Need to interact with your Kubernetes cluster? Talk to the API. The Kubernetes API is the front end of the Kubernetes control plane, handling internal and external requests.The kube-apiserver is responsible for API validation for all resource creation requests before the resources are actually generated and saved to the data store. Users can communicate with the API server via the kubectl command line client or through REST API calls.

kube-controller-manager

Kubernetes manages applications through various controllers that operate on the general model of comparing the current status against a known spec. These controllers are control loops that continuously ensure that the current state of the cluster (the status) matches the desired state (the spec). They watch the current cluster state stored in etcd through the kube-apiserver and create, update, and delete resources as necessary. kube-controller-manager is shipped with many controllers such as:
  • Node Lifecycle controller
  • DaemonSet controller
  • Deployment controller
  • Namespace controller

kube-scheduler

Since Kubernetes is an orchestration framework, it has builtin logic for managing the scheduling of pods. The kube-scheduler component is responsible for this. Scheduling decision depends on a number of factors such as:

Resource requirements of the app
Resource availability across nodes
Whether the pod spec has affinity labels requesting scheduling on particular nodes
Whether the nodes have certain taints/tolerations preventing them from being included in the scheduling process

The kube-scheduler takes all of these considerations into account when scheduling new workloads.

cloud-controller-manager

The cloud-controller-manager is responsible for managing the controllers associated with builtin cloud providers. These controllers are dedicated to abstracting resources offered by individual cloud providers and mapping them to Kubernetes objects.
Cloud controllers are the main way that Kubernetes is able to offer a relatively standardized experience across many different cloud providers.

Node Components

The node, or worker, machines are the primary workhorses of Kubernetes clusters. While the master components handle most of the organization and logic, the nodes are responsible for running containers, reporting health information back to the master servers, and managing access to the containers through network proxies.

Container Runtime(Famously Docker)

The container runtime is the component responsible for running the containers within pods. Rather than being a specific technology as with the other components, the container runtime in this instance is a descriptor for any container runtime that is capable of running containers with the appropriate features. Docker, CRI-O and containerd are some of the popular options for container runtimes.

kubelet

The kubelet component is an agent that runs on every worker node of the cluster. It is responsible for managing all containers running in every pod in the cluster. It does this by ensuring that the current state of containers in a pod matches the spec for that pod stored in etcd.

kube-proxy

The kube-proxy component is a network proxy that runs on each node. It is responsible for forwarding requests. The proxy is somewhat flexible and can handle simple or round robin TCP, UDP or SCTP forwarding. Each node interacts with the Kubernetes service through kube-proxy.

Monday, August 7, 2017

Containers vs Virtual Machine vs Docker

Container

Using containers, everything required to make a piece of software run is packaged into isolated containers. Unlike VMs, containers do not bundle a full operating system - only libraries and settings required to make the software work are needed. This makes for efficient, lightweight, self-contained systems and guarantees that software will always run the same, regardless of where it’s deployed. Docker is an example of container technology, there are many other likes containerd, CRI-O etc

Virtual Machine(VM'S)

Virtual machines (VMs) are an abstraction of physical hardware turning one server into many servers. The hypervisor allows multiple VMs to run on a single machine. Each VM includes a full copy of an operating system, one or more apps, necessary binaries and libraries - taking up tens of GBs. VMs can also be slow to boot.

Containers vs Virtual Machines

Containers and virtual machines have similar resource isolation and allocation benefits, but function differently because containers virtualize the operating system instead of hardware, containers are more portable and efficient


Docker

Docker is the world's leading software containerization platform, there are many other  Docker’s website describes it as “an open-source engine that automates the deployment of any application as a lightweight, portable, self-sufficient container that will run virtually anywhere.”.

  • Docker is built on top of LXC, and therefore runs containers, not VMs as VirtualBox for instance 
  • Docker containers are made of portable “images”, similar to LXC/VZ templates, but much more powerful (versionning, inheritance …) 
  • Docker “images” can easily be created via Dockerfile’s, where are set the base image and the steps to run in order to create your image 
  • Docker allows to have run multiple instances of your container without needing to copy the image (base system) files 
  • Docker daemon (which manages / runs LXC containers) provides a REST API used by Docker CLI utility … but this REST API can be used by any application 
  • Docker runs on virtually all operating systems (Linux, Mac OS, Windows …) and platforms (Google Cloud Platform, Amazon EC2) 
Docker is the world's leading software containerization platform.


Wednesday, June 7, 2017

Changing MySQL Data Disk/Directory on Linux


First stop Mysql service

/etc/init.d/mysqld stop
rename the mysql directory
mv /var/lib/mysql /var/lib/mysql_old

Mount a secondary disk as data disk, I have mounted /disk2 to my /dev/sdb

create a folder ‘mysql’ in destination disk/partition

copy whole Mysql data directory to ‘mysql’ in preserve mode

cp –pr /var/lib/mysql/ /disk2/mysql

-p means preserve the specified attributes (default: mode, ownership, timestamps)


then create a symbolic link from new data directory to old data directory

ln -s /disk2/mysql/ /var/lib/mysql/

Change permissions on /var/lib/mysql.

chown -R mysql:mysql /var/lib/mysql

If AppArmor is not enabled you do not need to do below. But it is recommended to have AppArmor enabled for security. Follow below steps to allow mysql access through AppArmor:

vim /etc/apparmor.d/usr.sbin.mysqld and add the data directory to it
/disk2/database/mysql/** rwk,
 /disk2/database/mysql/ r,

Now start Mysql service
/etc/init.d/mysqld start
If its working properly then delete each file and folder from old data directory

cd /var/lib/mysql_old rm –rf  *

NOTE: Please take a backup of your MySQL databases before attempting migration.

Thursday, March 2, 2017

How to Redirect HTTP to HTTPS in Apache

Apache’s mod_rewrite makes it easy to require SSL to be used on your site and to gently redirect users who forget to add the https when typing the URL. Using Apache to redirect http to https will make sure that your site (or a part of it) will only be accessed by your customers using SSL.  This is better than using SSLRequireSSL because users often forget to type in the https and will be automatically redirected.

Before you can set up an Apache redirect from http to https, you will need to do the following:

Make sure your SSL certificate is successfully installed so you can access https://www.yoursite.com (for more information see our Apache SSL Installation instructions)
Make sure mod_rewrite is enabled in Apache
Now you just need to edit your httpd.conf file or the file where your virtual host is specified and add these lines to redirect http to https:

RewriteEngine On
RewriteCond %{HTTPS} off
RewriteRule (.*) https://%{HTTP_HOST}%{REQUEST_URI}

In many cases, you can also just add those lines to a file named .htaccess in the folder that you want to redirect http to https.

Now, when a visitor types http://www.yoursite.com/mypage.htm the server will automatically redirect http to https so that they go to https://www.yoursite.com/mypage.htm

Note: You can also redirect a single page from http to http in Apache by using this in your configuration file or .htaccess file:

RewriteEngine On
RewriteRule ^apache-redirect-http-to-https\.html$ https://www.yoursite.com/apache-redirect-http-to-https.html [R=301,L]

Run sudo a2enmod rewrite to enable it. Restart apache using sudo service apache2 restart and provided your .htaccess syntax is correct this will work.

https://www.sslshopper.com/apache-redirect-http-to-https.html

Monday, January 23, 2017

Slow query logs in AWS MySQL RDS

The MySQL slow query log and the general log can be written to a file or a database table by setting parameters in your DB parameter group. You must set these parameters before you can view the slow query log or general log in the Amazon RDS console or by using the Amazon RDS API, Amazon RDS CLI, or AWS SDKs.

You can control MySQL logging by using the parameters in this list:

slow_query_log: To create the slow query log, set to 1. The default is 0.
general_log: To create the general log, set to 1. The default is 0.
long_query_time: To prevent fast-running queries from being logged in the slow query log, specify a value for the shortest query execution time to be logged, in seconds. The default is 10 seconds, the minimum is 0. If log_output = FILE, you can specify a floating point value that goes to microsecond resolution. If log_output = TABLE, you must specify an integer value with second resolution. Only queries whose execution time exceeds the long_query_time value are logged. For example, setting long_query_time to 0.1 prevents any query that runs for less than 100 milliseconds from being logged.
log_queries_not_using_indexes: To log all queries that do not use an index to the slow query log, set to 1. The default is 0. Queries that do not use an index are logged even if their execution time is less than the value of the long_query_time parameter.

log_output option: You can specify one of the following options for the log_outputparameter.

TABLE (default)– Write general queries to the mysql.general_log table, and slow queries to the mysql.slow_log table.
FILE– Write both general and slow query logs to the file system. Log files are rotated hourly.
NONE– Disable logging.

When logging is enabled, Amazon RDS rotates table logs or deletes log files at regular intervals. This measure is a precaution to reduce the possibility of a large log file either blocking database use or affecting performance. FILE and TABLE logging approach rotation and deletion as follows:

When FILE logging is enabled, log files are examined every hour and log files older than 24 hours are deleted. If the remaining combined log file size after the deletion exceeds a threshold of 2 percent of a DB instance's allocated space, then the largest log files are deleted until the log file size no longer exceeds the threshold.

When TABLE logging is enabled, log tables are rotated every 24 hours if the space used by the table logs is more than 20 percent of the allocated storage space or the size of all logs combined is greater than 10 GB. If the amount of space used for a DB instance is greater than 90 percent of the DB instance's allocated storage space, then the thresholds for log rotation are reduced. Log tables are then rotated if the space used by the table logs is more than 10 percent of the allocated storage space or the size of all logs combined is greater than 5 GB. You can subscribe to the low_free_storage event to be notified when log tables are rotated to free up space.

When log tables are rotated, the current log table is copied to a backup log table and the entries in the current log table are removed. If the backup log table already exists, then it is deleted before the current log table is copied to the backup. You can query the backup log table if needed. The backup log table for the mysql.general_log table is namedmysql.general_log_backup. The backup log table for the mysql.slow_log table is named mysql.slow_log_backup.

You can rotate the mysql.general_log table by calling the mysql.rds_rotate_general_log procedure. You can rotate the mysql.slow_logtable by calling the mysql.rds_rotate_slow_log procedure.

Table logs are rotated during a database version upgrade.

* from AWS Documents

Wednesday, August 17, 2016

VirtualBox kernel modules do not match this version error (RTR3InitEx failed with rc=-1912 (rc=-1912) )

I have successfully fixed the issue in my Ubuntu 16.04.1 LTS
Check the package
dpkg -l | grep -i virtualbox

Uninstall from system
sudo apt-get remove unity-scope-virtualbox
sudo apt-get update && sudo apt-get remove --purge virtualbox-5.1

wget -q https://www.virtualbox.org/download/..._vbox_2016.asc -O- | sudo apt-key add -
wget -q https://www.virtualbox.org/download/oracle_vbox.asc -O- | sudo apt-key add -

Finally install it:

sudo apt-get update
sudo apt-get install virtualbox-5.1


This fixed the issue for me 

Thursday, May 19, 2016

Generating Self Signed Certificate

When using the SSL Endpoint feature for non-production applications, you can avoid the costs associated with the SSL certificate by using a self-signed SSL certificate. Though the certificate implements full encryption, visitors to your site will see a browser warning indicating that the certificate should not be trusted.

In order to successfully install an SSL certificate you need the following things

CSR file
Private key
Certificate key

I am assuming the below,

Domain Name: testssl.com

A private key and certificate signing request are required to create an SSL certificate. I am going to use 'openssl req' to generate the certificates.

Initiate a CSR

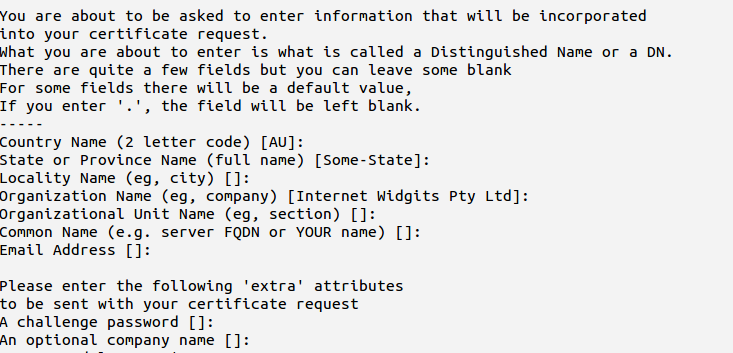
openssl req -new -newkey rsa:2048 -nodes -keyout testssl.key -out testssl.csr

After this command you need to provide the details about the organization and what type (wildcard or subdomain) of certificate you are going to generate. You can hit enter for a “challenge password”, leaving the password empty.


Now you have completed generating the private key and the CSR.

This will create below files

testssl.csr--will be used in creating certificate
testssl.key--> Private key (need to convert in pem format)

Generate SSL certificate
The self-signed SSL certificate is generated from the testssl.key private key and testssl.csr files.

openssl x509 -req -days 365 -in testssl.csr -signkey testssl.key -out testssl.crt

The testssl.crt file is your site certificate for use with SSL add-on along with the testssl.key private key.

Applying on HAProxy:

In most cases, you can simply combine your SSL certificate (.crt or .cer file provided by a certificate authority) and its respective private key (.key file, generated by you). Assuming your certificate file is called testssl.crt, and your private key file is called testssl.key, here is an example of how to combine the files:

cat testssl.crt testssl.key > testssl.pem
sudo cp testssl.pem /etc/ssl/private/

This creates the combined PEM file, called example.pem and copies it to /etc/ssl/private. As always, be sure to secure any copies of your private key file, including the PEM file (which contains the private key).

If the above method doesn't work then you can convert your file to PEM format like belwo:

openssl rsa -in testssl.key -outform PEM -out testssl.pem

openssl x509 -inform PEM -in testssl.crt -out testssl-cert.pem

Combined these two and put in HAProxy config file e.g.

cat testssl-crt.pem testssl.pem > testssl.pem

Edit HAProxy config file and add the certificate

vim /etc/haproxy/haproxy.cfg

frontend localhost
    bind *:80
    bind *:443 ssl crt /etc/ssl/private/testssl.pem
    mode http
    default_backend nodes